
Tag Cast Iron Pizza
The Definitive Guide to Mastering Cast Iron Pizza: From Dough to Crispy Crust
Achieving a truly exceptional pizza at home often feels like a quest, a pursuit of that elusive perfect crust – simultaneously chewy, airy, and possessing a satisfying crisp. While oven temperatures, dough hydration, and topping ratios all play crucial roles, the unsung hero in this culinary endeavor is undoubtedly the cast iron skillet. Its unparalleled heat retention and distribution capabilities transform a standard oven into a pizza-making powerhouse, delivering results that rival those of professional pizza ovens. This comprehensive guide delves deep into the art and science of cast iron pizza, covering everything from selecting the right skillet to crafting dough, achieving optimal heat, and layering toppings for an unforgettable homemade pie.
The fundamental advantage of cast iron for pizza lies in its thermal mass. Unlike thinner metal pans that fluctuate in temperature readily, cast iron absorbs and holds an immense amount of heat. When a pizza dough meets a preheated cast iron skillet, that stored energy is immediately transferred to the dough’s underside. This intense, direct heat is crucial for achieving the rapid oven spring and caramelization that defines a perfectly cooked pizza crust. The Maillard reaction, responsible for browning and developing complex flavors, is significantly accelerated, leading to that sought-after crispy, slightly charred bottom. Furthermore, the even heat distribution of cast iron minimizes hot spots, preventing uneven cooking and ensuring a consistent texture across the entire crust. When considering a cast iron skillet for pizza, opt for one with a substantial weight and a flat, uninterrupted cooking surface. A diameter of 10 to 14 inches is ideal for single-serving pizzas or smaller pies that can be easily managed within a home oven. Seasoning is also paramount; a well-seasoned skillet will provide a naturally non-stick surface, crucial for releasing the cooked pizza without tearing or sticking.
The foundation of any great pizza is its dough. While many recipes can be adapted for cast iron, a slightly higher hydration dough often performs exceptionally well. Higher hydration doughs (typically 65-70% water to flour ratio) are more extensible, meaning they can be stretched thinner without tearing, and they tend to produce a lighter, airier crust with larger, more irregular air pockets. For cast iron pizza, a good starting point is a simple dough consisting of bread flour (for its higher gluten content, providing structure and chew), water, yeast (instant or active dry), salt, and a touch of olive oil. Kneading is essential to develop the gluten network. This can be done by hand or using a stand mixer. The goal is a smooth, elastic dough that springs back when poked. After kneading, the dough needs to ferment. A long, slow cold fermentation in the refrigerator (24-72 hours) is highly recommended. This process not only develops complex flavors but also makes the dough easier to handle and stretch. The cold temperature slows down yeast activity, allowing enzymes to break down starches into sugars, contributing to browning and flavor. When it’s time to make pizza, remove the dough from the refrigerator at least 1-2 hours before shaping to allow it to come to room temperature. This makes it more pliable and easier to stretch.
Preheating the cast iron skillet is arguably the most critical step in the cast iron pizza-making process. The skillet needs to be screaming hot to mimic the intense heat of a professional pizza oven. Many chefs and home cooks advocate for preheating the skillet in the oven at the highest possible temperature your oven can reach, typically 500-550°F (260-290°C), for at least 30-60 minutes. Some even recommend preheating it for longer, especially if using a thicker, heavier skillet. It’s crucial to understand that the oven temperature will drop when the door is opened. Therefore, the skillet must be thoroughly heated beforehand. An oven thermometer is a valuable tool to ensure your oven is truly reaching its set temperature. When placing the hot skillet into the oven, use heavy-duty oven mitts or silicone handle covers for safety. The goal is to create a radiant heat environment that instantly begins cooking the bottom of the pizza as soon as it makes contact. The preheating time is not just about reaching temperature; it’s about allowing the cast iron to evenly distribute that heat throughout its mass.
Shaping the dough for a cast iron pizza requires a gentle touch. Once the dough has come to room temperature and is pliable, begin by gently pressing it down from the center outwards, leaving a slightly thicker edge for the crust. Avoid using a rolling pin, which can deflate the air bubbles crucial for a light crust. Instead, use your fingertips and palms to stretch the dough, rotating it as you go. If the dough resists stretching, let it rest for 5-10 minutes, covered, and then resume. The ideal thickness for a cast iron pizza dough is relatively thin, around 1/8 to 1/4 inch, allowing for quick cooking and a crispy base. Once stretched to your desired size, gently transfer it to a piece of parchment paper. This parchment paper acts as a crucial intermediary, allowing you to safely transfer the assembled pizza into the intensely hot cast iron skillet without touching the hot metal directly or having the toppings slide off.
Assembling the pizza requires speed and precision, especially when working with a very hot skillet. Once the dough is stretched and on parchment paper, lightly dust the parchment with a bit of cornmeal or semolina flour. This adds an extra layer of crispness to the bottom and acts as a lubricant for sliding the pizza into the pan. Begin with a light layer of sauce, ensuring not to overload it, as too much moisture can lead to a soggy crust. A thin, even spread of your favorite pizza sauce is ideal. Next, add your cheese. A blend of low-moisture mozzarella is a classic choice for its meltability and mild flavor. Consider adding some grated Parmesan or Pecorino Romano for an extra punch of umami. Now, add your toppings. It’s crucial to pre-cook any toppings that release a lot of moisture, such as mushrooms, onions, or some vegetables, to prevent them from making the pizza watery. Pepperoni, cured meats, and olives are generally safe to add directly. Again, avoid overloading the pizza; fewer, well-chosen toppings will yield a better result.
The moment of truth arrives with transferring the assembled pizza to the preheated cast iron skillet. Carefully remove the skillet from the oven, placing it on a heat-resistant surface. With confidence and speed, grasp the edges of the parchment paper and carefully slide the pizza, parchment and all, into the screaming hot skillet. The parchment paper acts as a temporary barrier, protecting you from direct contact with the hot cast iron while allowing the dough to begin cooking immediately. Once the pizza is centered in the skillet, you can carefully try to pull out the parchment paper from under the pizza after about 2-3 minutes of cooking. The crust will have set enough at this point to support the pizza without the parchment. This step is critical for achieving direct contact between the dough and the cast iron for optimal crisping. Some experienced pizza makers will omit the parchment entirely and carefully slide the dough directly into the skillet, but this requires a very well-seasoned pan and significant practice.
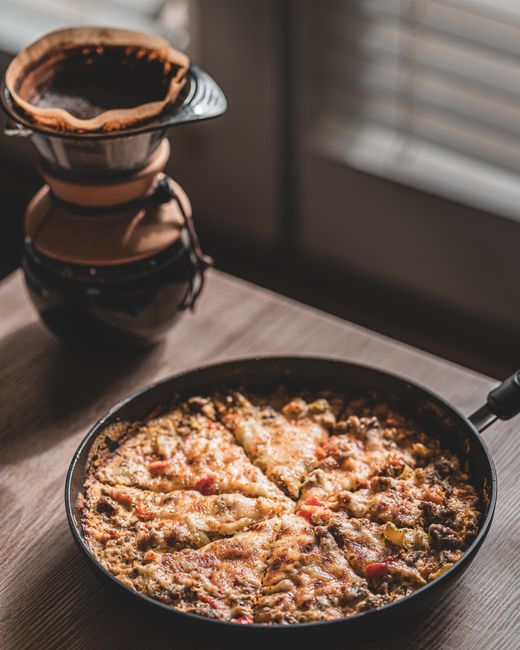
The baking process in a cast iron skillet is a balancing act between achieving a perfectly cooked crust and melting the toppings. Once the pizza is in the hot skillet, return it to the oven immediately. The baking time will vary depending on your oven’s temperature and the thickness of your pizza, but it typically ranges from 8 to 15 minutes. Keep a close eye on the pizza. The edges of the crust should start to puff up and turn golden brown. The cheese should be melted and bubbling, with some slightly browned spots. If the crust is browning too quickly on the bottom and the toppings aren’t quite done, you can try moving the skillet to a slightly higher rack in the oven. Conversely, if the toppings are cooking too fast and the crust isn’t yet golden, you might need to reduce the oven temperature slightly. Some pizza enthusiasts like to finish their cast iron pizzas under the broiler for the last minute or two to achieve extra char and caramelization on the toppings. This should be done with extreme caution, as the pizza can burn very quickly.
Removing the finished cast iron pizza requires the same care and attention as its introduction. Once the pizza is cooked to your liking, carefully remove the skillet from the oven using heavy-duty oven mitts. Use a sturdy metal spatula, or ideally, a pizza peel, to carefully slide under the pizza and lift it out of the skillet. Transfer the pizza to a cutting board or cooling rack to rest for a minute or two before slicing. This brief resting period allows the cheese to set slightly and prevents the toppings from sliding off when cut. The cast iron skillet itself will remain extremely hot for a significant amount of time, so it’s essential to exercise caution when handling it. Allow it to cool completely before washing or storing.
Cleaning and maintaining your cast iron skillet is crucial for its longevity and optimal performance for pizza making. After the skillet has cooled down completely, wash it with hot water and a stiff brush or a non-abrasive sponge. Avoid using harsh detergents, as these can strip away the seasoning. If there are any stubborn stuck-on bits, you can use a cast iron scraper or a bit of coarse salt as an abrasive. After washing, thoroughly dry the skillet immediately with a clean towel. This is essential to prevent rust. Once dry, apply a very thin layer of cooking oil (such as vegetable oil, canola oil, or flaxseed oil) to the entire surface of the skillet, both inside and out, and then wipe away any excess with a paper towel. This light oiling helps maintain and build the seasoning. Store the skillet in a dry place, and for added protection, you can place a paper towel between stacked cast iron to absorb any residual moisture. Regular use and proper care will ensure your cast iron skillet becomes an indispensable tool for creating consistently delicious pizzas.
Experimentation is key to unlocking your personal perfect cast iron pizza. Don’t be afraid to adjust dough hydration, fermentation times, sauce types, cheese blends, and topping combinations. The beauty of cast iron pizza lies in its versatility and the ability to achieve remarkable results in a home kitchen. From Neapolitan-inspired thin crusts to thicker, focaccia-like bases, the cast iron skillet provides a robust platform for culinary creativity. Mastering the preheating process, understanding dough handling, and paying attention to topping moisture are foundational elements that, when combined with the incredible heat-holding capabilities of cast iron, will undoubtedly elevate your homemade pizza game to an entirely new level, delivering crispy, flavorful, and utterly satisfying pies every time.
